
Cut a sequence on a multi-track timeline, bind any workflow to a clip, and generate the footage in place. NodeTool’s Video Editor is a non-linear editor where clips can be imported media or live workflow outputs that regenerate when you change their parameters.
Quick Access: Open a timeline at
/timeline/:sequenceId, or add a timeline tab from the workspace. Create a new sequence with + then New timeline in the workspace tab bar, or from the timeline list panel.
Overview
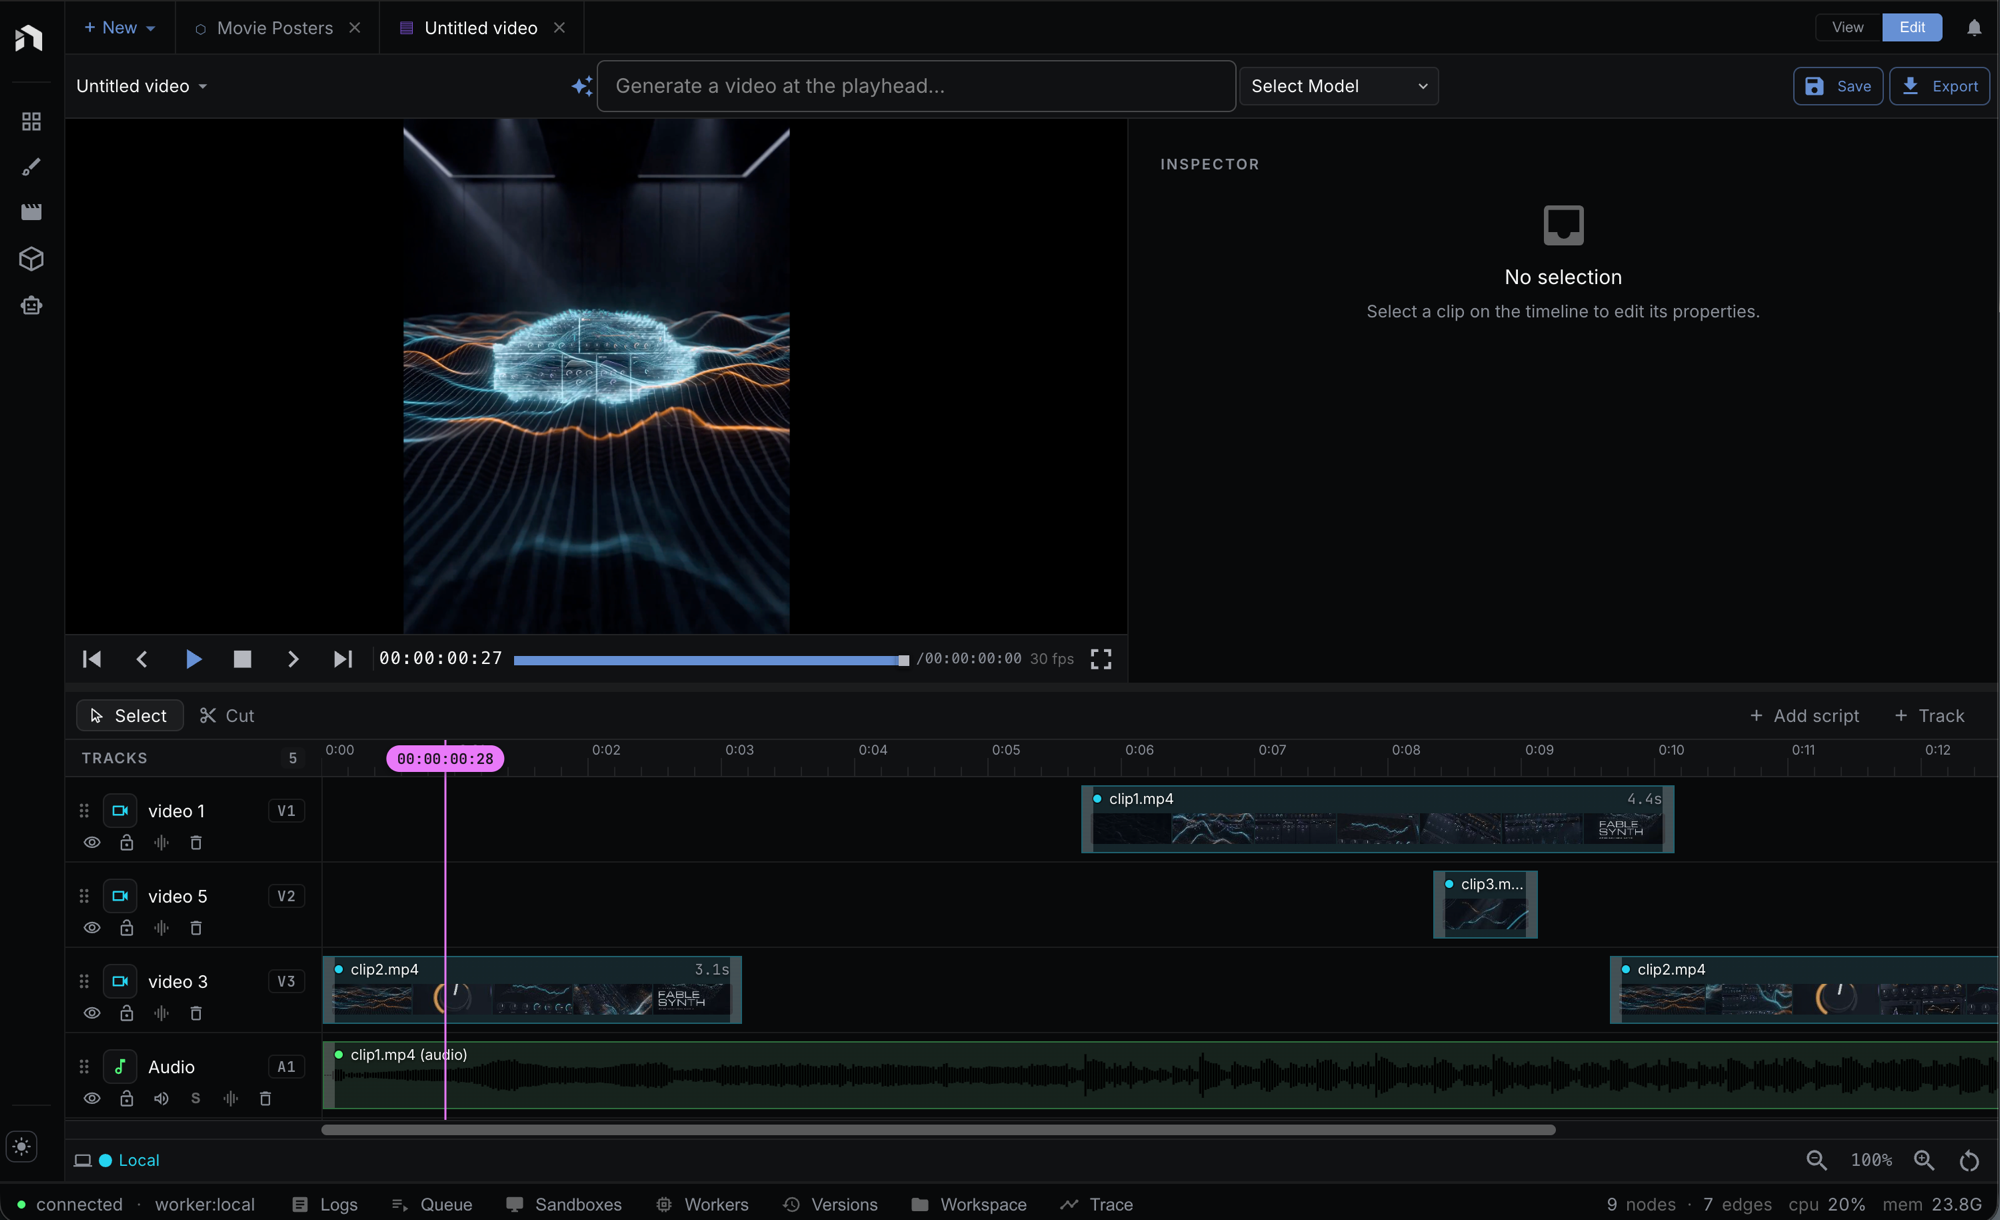
The Video Editor (timeline editor) is a non-linear, multi-track surface for assembling video, audio, and image clips. What sets it apart from a conventional NLE is that clips can be bound to NodeTool workflows — a clip can be the output of a text-to-image, image-to-video, or text-to-speech pipeline, and it stays editable: change a parameter and regenerate just that clip.
Features:
- Multi-track timeline — video, audio, overlay, subtitle, and MIDI tracks
- Imported clips (drag media from the Asset Explorer) and AI-generated clips side by side
- Authored text, shape, 3D model, group, and adjustment-layer clips with preset-based motion
- Clip editing — move, trim, split, duplicate, delete, ripple and roll edits, three drop modes, with snap-to-playhead and snap-to-clip alignment
- Real-time preview compositing with a GPU compositor (WebGPU, Canvas2D fallback) and WebAudio mixing
- Frame-accurate transport — play/pause, stop, frame-step, J/K/L shuttle, in/out range, markers, skip to clip boundaries, timecode readout
- Generated clips bound to any workflow, with parameters exposed in the Inspector
- Staleness tracking — edit a bound workflow and the clip is flagged for regeneration
- Version history per clip — keep the last N successful generations and restore them
- Export — render the whole timeline to MP4, WebM, or a PNG sequence at the sequence resolution, in the browser or server-side, or its audio alone to WAV or MP3 in the browser
- Full undo/redo and debounced autosave
Where this fits
The Video Editor is the surface where outputs become finished, time-based media. It pulls assets in as clips, binds workflows to generated clips so footage regenerates when parameters change, and exports the sequence back to a video asset — the same material a sketch, another workflow, or a Mini-App can pick up. Every surface shares one asset store and the same model/provider system.
See Key Concepts → How everything fits together for the full loop.
Opening the Video Editor
There are a few ways in:
- Direct route — navigate to
/timeline/:sequenceId. - Workspace tab — open a timeline as a tab alongside your workflows in
/workspace. - New sequence — click + in the workspace tab bar and choose New timeline, or use the timeline list panel.
Each timeline (whether a standalone page or a workspace tab) runs in its own isolated set of stores, so multiple timelines can be open at once without interfering.
Anatomy of the Editor
| Region | What it does |
|---|---|
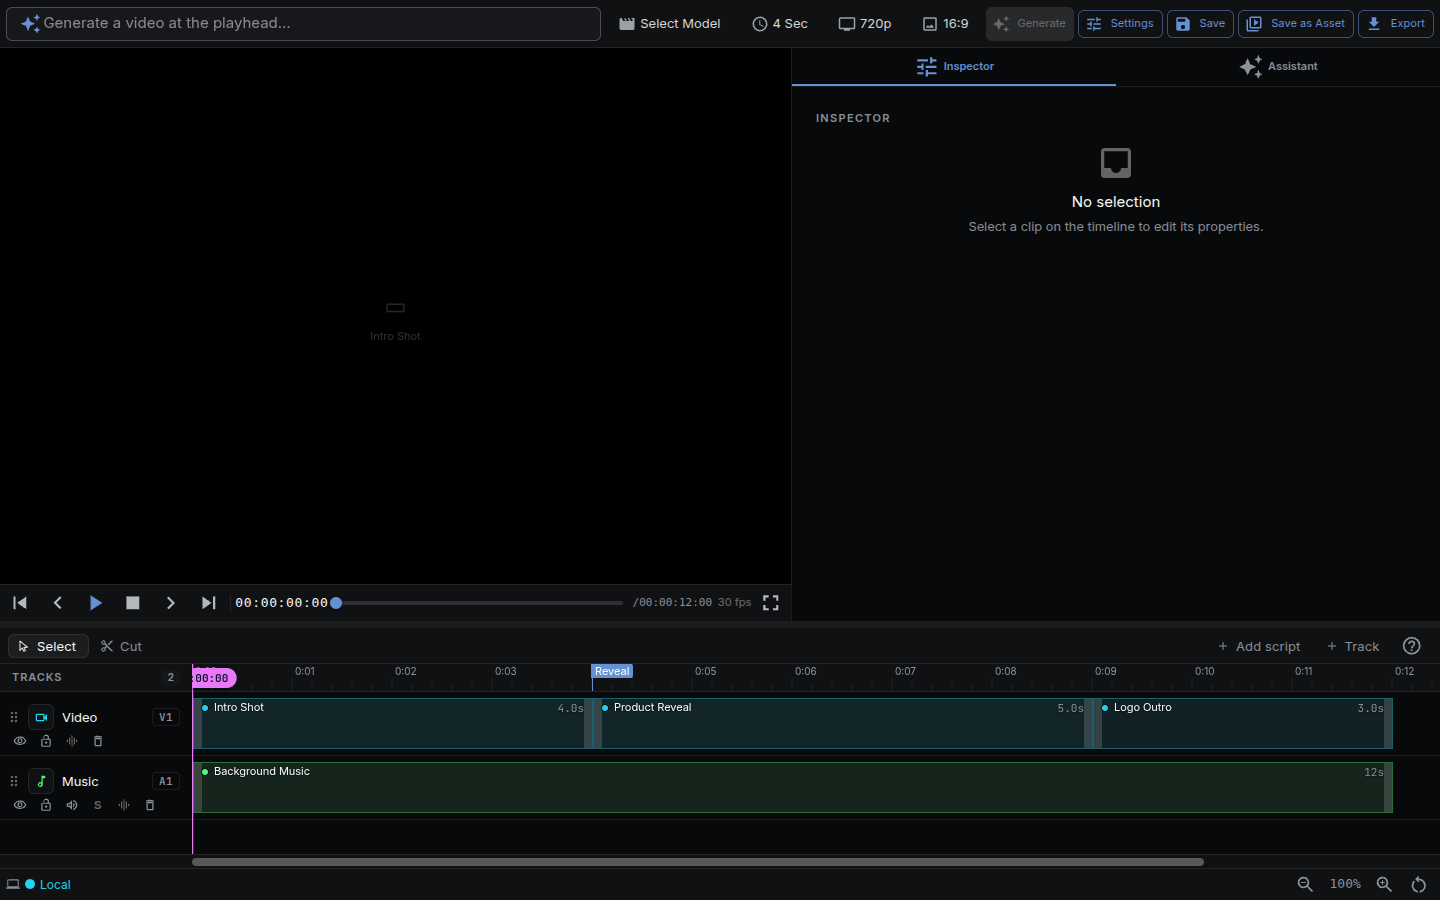
| Tab-row actions | Save, Export video, and an overflow menu with Project settings, Adapt format, Save as Asset, Export project (.zip), Export for Premiere Pro, and Export media (.zip). A code button appears when the timeline has embedded authoring code |
| Preview | The composited video with transport controls, timecode, a preview quality select (Auto, Full, Half, Quarter), and FPS readout |
| Tracks | The multi-track timeline — a canvas-rendered ruler, the playhead, and the clips |
| Side panel | Tabs for Inspector, Instruments, Source, Assistant, and History, plus Script and Code when the timeline has them |
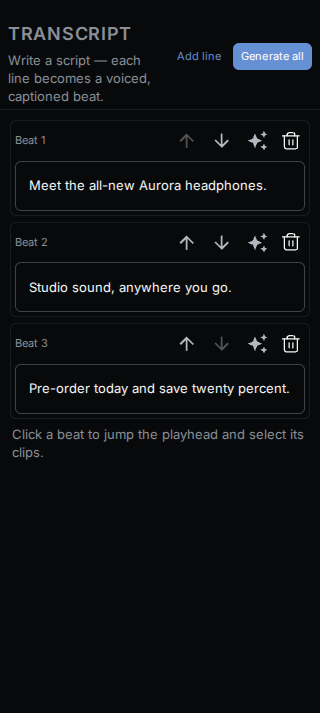
The Script panel on the left shows the linked script’s lines when the timeline has one, and the transcript editor when it does not. Each voiced line is a clip on the voiceover track, and the clip keeps the position you give it. See Script Editor.
Tracks & Clips
The timeline holds multiple tracks. Add one with the add-track button and choose Video, Audio, Overlay, Subtitle, or MIDI. Video and overlay tracks composite top-down. Audio and MIDI tracks mix together.
The toolbar above the tracks toggles Select and Cut tools, Ripple (trims and deletes close the gap they leave), the drop mode (Overwrite, Insert, or Overlap), Snap, Bars (a bars-and-beats ruler instead of timecode, with a grid division select), and Linked.
Clip operations:
- Add — drag media from the Asset Explorer onto a track, or add a generated clip from the add menu. Images and video fit video and overlay tracks, audio fits audio tracks, and 3D models fit video and overlay tracks. A drop on an incompatible track is refused. A drop in the second half of a clip starts at that clip’s end, so the clip keeps its length. In Overlap mode, and in a clip’s first half, the drop starts where you release it.
- Select — click a clip;
Shift/Ctrl-click to multi-select. - Move / trim — drag the body to move, drag the edges to trim the in/out points.
- Split — position the playhead and press
Sto cut a clip in two. - Duplicate / delete —
Ctrl/⌘ + Dto duplicate,Deleteto remove. - Snapping — clips snap to the playhead and to neighbouring clip boundaries for clean alignment. Hold
Altwhile dragging to turn snapping off. - Insert on drop — hold
Ctrl/⌘when releasing a dragged clip to push later clips right. - Ripple delete —
Shift + Deleteremoves a clip and closes the gap in the NodeTool layout. - Roll edit —
Ctrl/⌘-drag a clip edge to move the cut with its neighbour. - Markers and range —
Madds a marker,IandOmark the in and out points of a loop range. - Transitions —
Ctrl/⌘ + Tcross-fades into the selected clips. Other transition types aredipToColor,wipe,push,slide,zoom,whip,zoomBlur,glitch,gradientWipe,iris, andlightLeak, set from the clip’s Transition section. -
Fades — drag the grip at a clip’s top corner for an audio fade.
Alt + Tfades the selection in and out. - Duplicate by dragging — hold
Altwhen you start dragging a clip to leave a copy where it was. - Gaps — click the empty stretch between two clips to select it, then press
Deleteto close it. - Speed and gain —
Ctrl/⌘ + Rsets the speed or duration of the selection, with an option to push later clips.Gsets or adjusts the audio gain. - Paste attributes —
Ctrl/⌘ + Alt + Vcopies chosen settings (motion, opacity, effects, animations, speed, volume, audio effects) from the copied clip onto the selection.
Linked clips that share a link (for example a video and its extracted audio) move and trim together.
Track targeting and sync lock. The number chip at the start of each track header targets the track. Add Edit with nothing selected, Lift, Extract, paste, the source edits, cut navigation, and match frame act on targeted tracks only. Every track starts targeted. The sync-lock button beside the lock keeps a track in step with ripple edits on other tracks. Turn it off and ripples leave that track where it is.
Preview & Playback
The preview composites every visible, unmuted track in real time.
- Transport — play/pause, stop, step one frame forward/back, and skip to the previous/next clip boundary.
- Timecode — frame-accurate
HH:MM:SS:FFreadout, with the sequence FPS shown alongside. Click it to type a time. Digits fill from the frames, so1000is ten seconds, and+12or-1:00moves from where you are. - Loop — the loop button (
Shift + L) repeats the in to out range. With loop off, Play runs past the marks andCtrl/⌘ + Shift + Spaceplays from in to out once. - Match frame —
Fopens the media of the clip under the playhead in the source monitor at the same frame.Shift + Fonly selects it in Assets. - Scrubbing — drag the playhead across the ruler to scrub.
- Zoom —
Ctrl/⌘ + scrollzooms the timeline anchored at the cursor.Shift + scrollpans. The timeline view control holds horizontal and vertical zoom sliders. - Audio — per-clip gain and fades, per-track mute/solo and volume, mixed down to a master output. Audio clips render a waveform in the clip body.
Video and audio are kept in sync by driving playback against the audio clock.
Generated Clips
A clip doesn’t have to be a file — it can be the output of a workflow.
Generation modes:
- Text-to-video — on a video track, generate a clip from a prompt and a video model.
- Text-to-image / image-to-image — on an overlay track, generate a still from a prompt, optionally from a source clip.
- Image-to-video — animate an image clip from its Inspector. See Image to Video.
- Text-to-speech / text-to-music — on an audio track, synthesize speech or music.
- Workflow — bind any NodeTool workflow with an output node to the clip.
The add menu opens prompt-first: type a prompt, pick a model, and press Enter to drop a clip at the playhead. Workflow-bound clips are under the Templates and All workflows tabs. The menu also adds a 3D model clip and an adjustment layer.
When you bind a workflow, NodeTool clones it into a clip-private variant and exposes the workflow’s Input* nodes as editable parameters in the Inspector — so you can tweak the prompt, seed, or any input and regenerate without leaving the timeline.
Staleness & versions:
- Each clip tracks a content hash of the bound workflow plus its parameter overrides. Edit the workflow (or its inputs) and the clip is flagged stale.
- A clip moves through states: draft → queued → generating → generated, plus stale, failed, locked, and missing.
- Successful generations are kept as versions — restore, favourite, or delete previous results per clip.
- Generation runs on the standard
WorkflowRunner; status streams back over the WebSocket connection keyed by job, so the timeline only listens to the jobs it cares about.
Round-tripping to the node editor: from a generated clip you can Open in Node Editor to edit the bound workflow on the full canvas, then return — the clip auto-marks stale so you can regenerate with the new logic.
Inspector
The Inspector swaps based on what’s selected:
- Imported clip — timing, render (transform, opacity, blend mode), and media controls, plus sections for time remap, keyframes, effects, mask and matte, tracking, Smart Reframe, and AI Edit where they apply.
- Generated clip — a vertical node stack of the bound workflow’s nodes, each with its parameters (reusing NodeTool’s property fields) and a per-node status indicator, with a Generate or Regenerate button. The clip-actions row has Duplicate, Regenerate as new clip, Lock, Replace Output, and Open in Node Editor. The History section lists versions.
- Text or shape clip — content and appearance controls for text, fill, stroke, geometry, and corner radius.
Every visual clip includes an Animate section. Add an entrance, exit, emphasis, or loop preset, then adjust its timing, easing, and preset parameters.
Image to Video
Select an image clip and open Image to Video in the Inspector. Describe the motion, pick a model that supports image_to_video, and press Generate video. The video clip lands on the video track directly above the image, over the same span, and a new track is inserted when that span is taken. It keeps the image clip’s duration when the model can render it, and otherwise takes the shortest duration the model offers that covers the clip. The aspect ratio and resolution are the model’s nearest match to the image’s own size. The new clip is an image-to-video clip with the image as its source, so it regenerates like any other generated clip.
Effects
Clips and tracks carry an effects chain that runs in the same compositor as the live preview:
- Clip effects — color, blur, glow, drop shadow, vignette, sharpen, chroma key, curves, levels, lift/gamma/gain, grain, pixelate, posterize, directional blur, lens distortion, stylize, generator, and LUT.
- Track effects — video tracks take color correction, blur, sharpen, vignette, and chroma key. Audio tracks take gain, 3-band EQ, filter (lowpass, highpass, bandpass), and compressor.
- Clip transforms — opacity, blend mode (normal, multiply, screen, overlay, darken, lighten, color dodge, color burn, hard light, soft light, difference, exclusion, add), speed, time remap, and fade-in/out.
The Canvas2D fallback skips chroma key, vignette, and sharpen.
Animations
Motion presets add animation without a keyframe editor. Select a visual clip, open Animate in the Inspector, choose a role and preset, then adjust duration or period, delay, easing, and preset parameters.
- In / Out — fade, slide, pop, spin, wipe, blur, and colorFade at a clip boundary. On text clips,
typewriteris an In preset. Wipe reveals the clip behind a directional mask with an adjustable feathered edge; blur racks from soft to sharp; colorFade blooms grayscale into full color. - Emphasis — pulse, flash, shake, bounce, squash, or followPath while the clip is active.
- Loop — kenBurns, float, breathe, rotate, hueShift, orbit, or followPath.
- Word stagger — on text clips, any animation can run once per word, each word offset in time from the previous (offset and on/off in the inspector;
staggeronui_timeline_animate_clipfor the agent). Words pop, slide, or fade in sequence — motion typography without keyframes. See plans/motion-typography.md. - Track markers — shaded edge wedges show entrance and exit windows; a loop icon marks emphasis or repeating motion. Select a marker to open its controls.
- Agent authoring — timeline tools can list presets, apply or clear motion, and inspect fixed-time frames before export.
Preview and export sample the same animation resolver, so transforms and opacity match at each frame.
Export
Export video in the tab row opens the Export timeline dialog. Pick a format:
| Format | Notes |
|---|---|
| MP4 (H.264) | Plays everywhere. No transparency. |
| WebM (VP9) | VP9 video with Opus audio. Can keep an alpha channel with Export with transparency. |
| PNG sequence (.zip) | One PNG per frame plus a manifest.json with the rate and size. No audio. |
| WAV audio (16-bit) | The whole timeline’s audio mixdown in stereo, uncompressed at 48 kHz. No video. |
| MP3 audio (320 kbps) | The whole timeline’s audio mixdown in stereo, with the same mix as the video export. No video. |
- Rendering is frame-by-frame at the sequence resolution through the same compositor used for preview, so the export matches what you see.
- Audio is mixed offline and muxed with the encoded video.
- A progress dialog reports the phase (preparing, audio, video, finalizing) and the export can be cancelled.
- Save as Asset renders the timeline and stores the result in an asset folder you pick. Export project (.zip) bundles the timeline project.
- Export for Premiere Pro downloads a zip with a Final Cut Pro 7 XML sequence, the media its clips use, and
export-report.txt. In Premiere Pro, choose File > Import and pick the XML. Video, image, and audio clips keep their tracks, positions, in and out points, constant speed, opacity, volume, and enabled state. A video’s own sound lands on a linked audio track. Text, shapes, captions, effects, animations, transitions, and fades are not carried, and the report lists every clip affected. If Premiere asks to link media, locate one file in themediafolder and it relinks the rest. - Export media (.zip) downloads the original file of every video, image, and audio clip under
media/, untrimmed, withclips.csvlisting each clip’s track, timeline start and end, source in-point, and file. - Import (the upload button beside New timeline in the timeline list) takes a NodeTool project zip or a Premiere Pro sequence. For Premiere, choose File > Export > Final Cut Pro XML, zip the XML together with its media files, and import the zip. NodeTool matches media by file name and creates a new timeline with the same tracks, clip positions, in points, constant speed, opacity, volume, enabled state, and markers. Transitions become overlapping cuts. Nested sequences, titles, generators, and effects are left out, and the import says what it skipped.
- The
render_timelineagent tool and thenodetool.timeline.RenderTimelinenode render the same sequence server-side. They run this exporter in headless Chrome or Chromium, so the server render matches the export. Without a browser they fall back to a Node compositor and say so in the job log.render_timelinereturns a job id: poll it withget_joband stop it withcancel_job.
Change the sequence width, height, frame rate, and tempo in Project settings.
AI timeline editing
Generated clips can hold multiple takes, source-time media tracks, derived reframes, and nondestructive generative edits. Use them to compare a result, follow a subject, make another aspect-ratio cut, or repair a shot without changing the original edit. See AI Timeline Editing.
Keyboard Shortcuts
| Shortcut | Action |
|---|---|
Space |
Play / pause |
V / C |
Select tool / cut tool |
A / B / R / Y |
Track select, ripple, rate stretch, slip tools |
U / H / Z |
Slide, hand, zoom tools |
S |
Split clip at playhead |
Ctrl/⌘ + Shift + K |
Cut all tracks at playhead |
Delete / Backspace |
Delete selected clip(s) |
Shift + Delete |
Ripple delete |
Ctrl/⌘ + C / X / V |
Copy / cut / paste clips |
Ctrl/⌘ + D |
Duplicate selected clip(s) |
Ctrl/⌘ + A |
Select all clips |
← / → |
Nudge selection one frame |
Alt + ← / Alt + → |
Step the playhead one frame |
J / K / L |
Shuttle back / stop / forward |
I / O |
Mark in / mark out |
M |
Add marker |
N |
Toggle snapping |
Ctrl/⌘ + Z |
Undo |
Ctrl/⌘ + Shift + Z |
Redo |
Ctrl/⌘ + scroll |
Zoom timeline (anchored at cursor) |
? |
Open the full shortcut sheet |
These are the NodeTool layout. The shortcut sheet (?) also offers Premiere Pro and Final Cut Pro layouts, stored in the timelineKeyboardPreset setting, and lists every binding for the layout you pick.
Common Workflows
Assemble a rough cut from your assets
- Open a new sequence and drag clips from the Asset Explorer onto the video track.
- Trim and reorder clips; use
Sto split andDeleteto remove. - Add an audio track for music or narration and adjust per-clip volume and fades.
- Scrub the preview to check timing, then Export to MP4.
Generate a shot in place
- Add a generated clip on a video track and pick a video model (or bind a custom workflow).
- In the Inspector, set the prompt and inputs exposed from the workflow.
- Generate — the clip streams through queued → generating → generated.
- Not quite right? Tweak a parameter and Regenerate, or use Regenerate as new clip to keep the current render and compare takes.
Iterate on a bound workflow
- Select a generated clip and Open in Node Editor.
- Edit the workflow on the full canvas and save.
- Return to the timeline — the clip is flagged stale.
- Select the stale clip and choose Regenerate.
Related Features
- Workflow Editor — build the workflows you bind to generated clips
- Asset Management — organize the media you import as clips
- AI Timeline Editing — takes, tracking, reframing, generative edits, and interchange
- Sketch Editor — edit stills before or after they land on the timeline
- User Interface — tour of the main NodeTool views
Next Steps
- Bind one of your existing workflows to a clip and generate a shot.
- Build a multi-track sequence mixing imported footage with generated clips.
- Explore the Cookbook for workflow patterns you can drop onto the timeline.
Last updated: July 2026