
Draw, paint, mask, and generate AI imagery on a layered canvas — without leaving your workflow.
Quick Access: Click + New in the workspace tab bar and choose New image for a blank canvas, or open a sketch from the left Sketches panel.
Overview
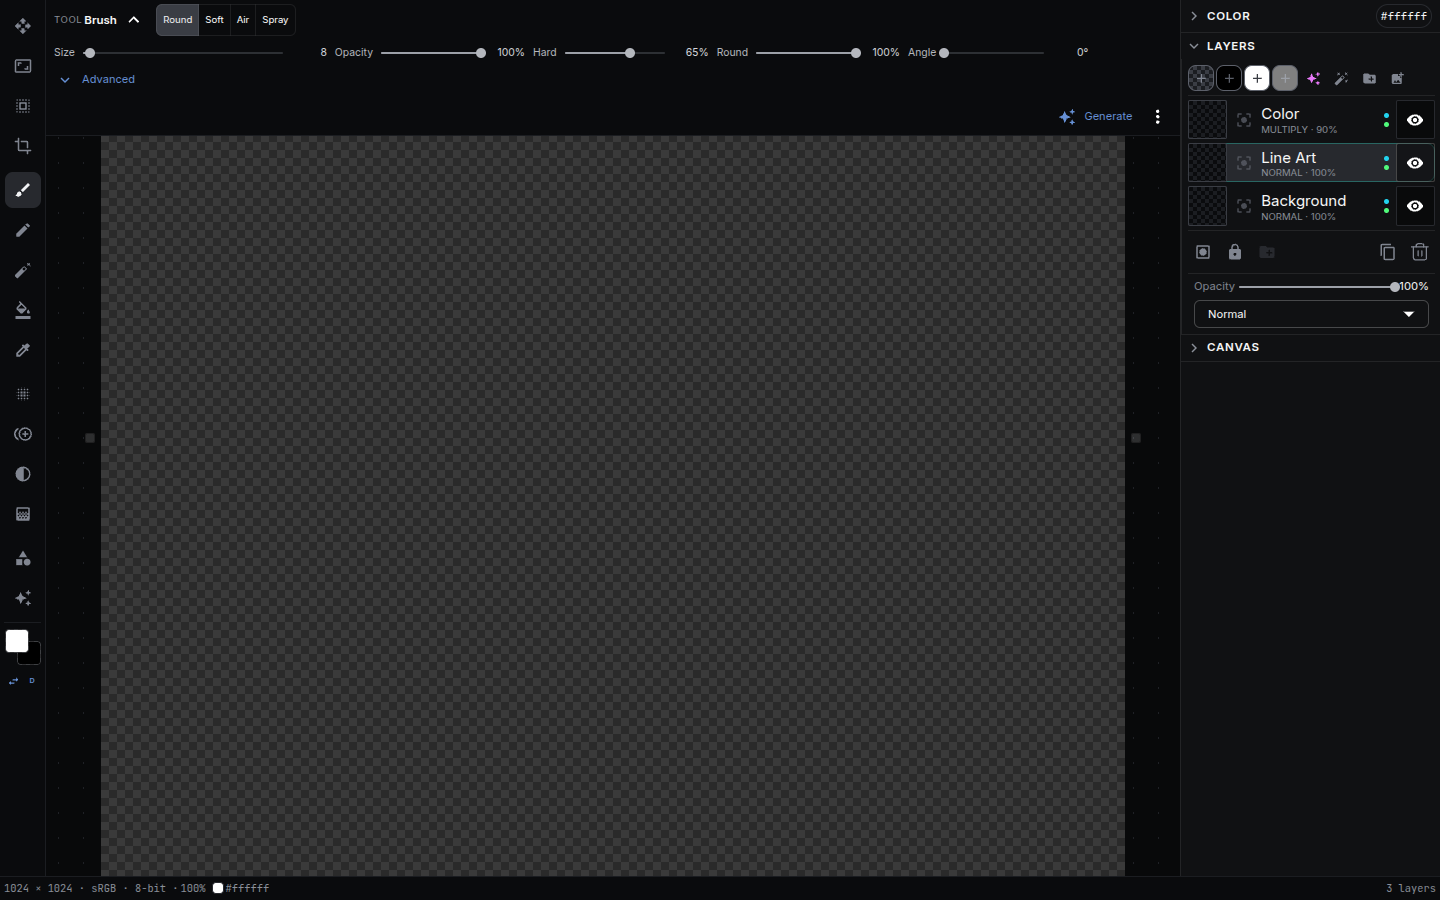
The Sketch Editor is a layered raster editor with a built-in AI generation pipeline. It combines a familiar painting toolset (brush, eraser, fill, shapes, transform, selection) with the ability to generate image content directly onto a layer — bound either to a model or to one of your own workflows.
Features:
- Layer stack with blend modes, per-layer opacity, lock, and visibility
- Painting tools: brush, pencil, eraser, fill, gradient, blur, clone stamp, color adjust
- Selection tools: rectangular marquee and AI-assisted magic wand / segmentation
- Shape tools: line, rectangle, ellipse, arrow
- Crop and free transform (scale, rotate, skew, perspective, deform)
- Pen-pressure support, stroke stabilization, and drawing symmetry
- AI layers — generate a layer from a prompt or bind it to a workflow; regenerate when inputs change
- Unlimited undo/redo with a full history
- Exports a flattened image, a mask, and per-layer outputs back into your workflow
Where this fits
The Sketch Editor is one of NodeTool’s editing surfaces, and it sits between manual editing and workflow automation. It opens an image asset, lets you paint or generate layers by hand or bind a layer to an image workflow, then renders the result back into an asset. That asset is the same material every other surface reads — drop it back on the canvas, drag it onto a timeline, or expose the workflow behind it as a Mini-App. Every surface shares one asset store and the same model/provider system.
See Key Concepts → How everything fits together for the full loop.
Opening the Editor
The Sketch Editor runs in three places, all backed by the same document so your work stays in sync.
From the new tab button
- Click + New in the workspace tab bar (top of the editor).
- Choose New image to open a blank canvas in a new tab, or Open asset… to edit an existing image.
- The editor fills the tab. Use Save to image to render the composite back into the asset, then Done to return the tab to view mode.
From the Sketches panel
Open the Sketches panel in the left sidebar to browse documents you’ve created, grouped by date. Click one to open it, or use New Sketch to start a blank canvas.
As a standalone page
Every sketch has its own URL at /sketch/<documentId>. Opening a sketch in its own workspace tab gives you the full-screen editor for focused work. Changes autosave as you go.
The Workspace
| Region | What it does |
|---|---|
| Toolbar (left) | Pick a tool; switch foreground/background colors |
| Tool options (top) | Settings for the active tool — size, opacity, hardness, shape type, transform handles |
| Canvas (center) | Draw, paint, and composite; zoom and pan |
| Layers panel (right) | Add, reorder, blend, lock, hide, and group layers; mark a mask layer |
| Inspector (right) | Per-layer details — including AI generation controls for generated layers |
Press Tab to hide the panels for a clean, full-canvas view.
Tools
Select tools from the toolbar or by keyboard shortcut.
Move — V
Reposition the active layer or selection contents.
Brush — B
Paint freehand with the foreground color. Supports round, soft, airbrush, and spray brush styles, plus pen-pressure sensitivity.
- Size:
[decreases,]increases - Hardness:
{decreases,}increases - Opacity: press a digit
0–9for a preset (5= 50%,0= 100%)
Pencil — P
Paint hard-edged, aliased strokes.
Eraser — E
Erase pixels on the active layer. Shares size, hardness, and opacity controls with the brush.
Fill — G
Flood-fill contiguous regions with the foreground color, using an adjustable tolerance.
Gradient — T
Drag to draw a gradient between the foreground and background colors.
Blur — Q
Paint to soften pixels under the brush.
Clone Stamp — S
Alt-click to set a source point, then paint to copy detail from there — useful for retouching and removing blemishes.
Color Adjust — J
Paint hue, saturation, and brightness adjustments onto the layer.
Eyedropper — I
Click the canvas to sample a color into the foreground swatch.
Crop — C
Reframe the canvas. Drag the crop box, then press Enter to commit or Esc to cancel.
Transform — F (or Ctrl/⌘ + T)
Free-transform the active layer or selection with a handle box. The Mode toggle in the tool options picks how corner drags behave:
| Mode | Behavior |
|---|---|
| Move/Scale | Scale and rotate the box. Ctrl/⌘ on a side handle shears; Ctrl/⌘ + Alt + Shift promotes the drag to Perspective. |
| Perspective | Four-point projective transform — drag a corner and the opposite edge mirrors via axis projection. |
| Deform | Free four-point quad — only the corner you drag moves, the other three stay put. Shift locks the drag to one axis. |
Perspective and Deform produce a four-point quad, so a layer carrying one is transformed on its own: a multi-layer union applies a single affine delta and cannot carry a quad.
Entercommits,Esccancels,.resets the box to identity.Ctrl/⌘ + Shift + Trepeats the last transform.
Selection Tools
| Tool | Shortcut | Behavior |
|---|---|---|
| Rectangular marquee | M |
Drag a rectangular selection |
| Magic wand | W |
Click to select a region by color, with AI-assisted segmentation |
Once a selection is active, paint and edit operations are constrained to it. Ctrl/⌘ + D deselects.
Shape Tools — U
Draw vector-style shapes onto a layer.
| Shape | Shortcut |
|---|---|
| Line | L |
| Rectangle | R |
| Ellipse | O |
| Arrow | A |
Hold Shift while dragging to constrain proportions (squares, circles, 45° lines).
Layers
The editor is layer-based. Stack layers, reorder them, toggle visibility, lock them, group them, and composite them with blend modes.
- Blend modes — choose how a layer combines with those beneath it (Normal, Multiply, Screen, Overlay, and more). In the Layers panel,
↑/↓step through blend modes. - Opacity — set per-layer transparency.
- Lock — protect a layer from edits.
- Mask layer — designate a layer as the document’s mask. It’s exported as a separate mask output for inpainting and compositing nodes.
- Layer via copy / cut —
Ctrl/⌘ + Jcopies the current selection to a new layer;Ctrl/⌘ + Shift + Jcuts it to a new layer. - Clear layer —
DeleteorBackspaceclears the active layer (or selection). - Fill layer —
Ctrl/⌘ + Backspacefills with the background color;Alt + Backspacefills with the foreground color.
AI Generation
What sets the Sketch Editor apart is that a layer can be generated, not just painted. Select a layer and open the Inspector to bind it to a generator:
- Prompt-based generation — pick a provider and model, write a prompt, and generate text-to-image, image-to-image, or inpaint results directly onto the layer.
- Workflow-bound generation — bind the layer to one of your own workflows and choose which output node feeds the layer. The layer becomes a live surface for any pipeline you’ve built.
Each generation is tracked as a version on the layer, so you can compare results and roll back. NodeTool also tracks each layer’s inputs: if you change a prompt, parameter, or an upstream layer the generation depends on, the layer is flagged stale so you know it’s worth regenerating. Generation runs as a job over the WebSocket connection, with live progress shown on the layer.
This makes the editor a natural place to sketch a rough composition, mask a region, and let a model fill it in — then keep painting on top.
Colors
The editor maintains a foreground and background color.
Xswaps the foreground and background colors.Dresets them to the defaults (black / white).Ctrl/⌘ + Iinverts the colors of the active layer.
Symmetry & Pen Pressure
- Symmetry — mirror your strokes across horizontal, vertical, or radial axes (with configurable rays) for mandalas, patterns, and symmetric design. Enable it from the editor’s header controls.
- Pen pressure — when using a pressure-sensitive device, tune how pressure maps to brush size and opacity from the pen-pressure settings.
- Stroke assist — stabilize shaky strokes or snap lines to angles for cleaner linework.
History & Undo
The editor keeps a full history of your changes.
| Action | Shortcut |
|---|---|
| Undo | Ctrl/⌘ + Z |
| Redo | Ctrl/⌘ + Shift + Z (or Ctrl/⌘ + Y) |
History persists while the editor is open. Large documents with extensive history use more memory.
Zoom & Navigation
| Action | Shortcut |
|---|---|
| Zoom in | + / = or scroll up |
| Zoom out | - or scroll down |
| Reset zoom (fit) | Ctrl/⌘ + 0 |
| Zoom to 100% | Ctrl/⌘ + 1 |
| Pan | Space + drag, or middle-click drag |
| Toggle panels | Tab |
Saving & Exporting
- Autosave — sketches save automatically as you work.
- Save to image — render the flattened composite back into the backing image asset, ready to use anywhere an image is.
- Workflow nodes — to pull a sketch into a graph, use the Render Sketch and Sketch Layers nodes, which flatten the document or expose its individual layers.
Because the document is shared across the tab, the Sketches panel, and the standalone page, your edits stay in sync everywhere it’s open.
Keyboard Shortcuts
Tools
| Key | Tool |
|---|---|
V |
Move |
B |
Brush |
P |
Pencil |
E |
Eraser |
G |
Fill |
T |
Gradient |
Q |
Blur |
S |
Clone stamp |
J |
Color adjust |
I |
Eyedropper |
M |
Rectangular marquee select |
W |
Magic wand select |
C |
Crop |
F |
Transform |
U |
Shape |
L |
Line |
R |
Rectangle |
O |
Ellipse |
A |
Arrow |
Edit & Selection
| Shortcut | Action |
|---|---|
Ctrl/⌘ + Z |
Undo |
Ctrl/⌘ + Shift + Z (or Ctrl/⌘ + Y) |
Redo |
Ctrl/⌘ + C / X / V |
Copy / cut / paste |
Ctrl/⌘ + Shift + V |
Paste masked |
Ctrl/⌘ + A |
Select all |
Ctrl/⌘ + D |
Deselect |
Ctrl/⌘ + Shift + D |
Reselect |
Ctrl/⌘ + Shift + I |
Invert selection |
Ctrl/⌘ + T |
Free transform |
Ctrl/⌘ + Shift + T |
Repeat last transform |
Ctrl/⌘ + J |
Layer via copy |
Ctrl/⌘ + Shift + J |
Layer via cut |
Ctrl/⌘ + I |
Invert colors |
Delete / Backspace |
Clear layer/selection |
Ctrl/⌘ + Backspace |
Fill with background color |
Alt + Backspace |
Fill with foreground color |
↑ ↓ ← → |
Nudge selection/layer by 1px |
Enter |
Commit transform / crop |
Esc |
Cancel / deselect |
Colors & Brush
| Shortcut | Action |
|---|---|
X |
Swap foreground/background colors |
D |
Reset colors to default |
[ / ] |
Decrease / increase brush size |
{ / } |
Decrease / increase hardness |
0–9 |
Set tool opacity preset (0 = 100%) |
Navigation
| Shortcut | Action |
|---|---|
+ / = |
Zoom in |
- |
Zoom out |
Ctrl/⌘ + 0 |
Reset zoom (fit) |
Ctrl/⌘ + 1 |
Zoom to 100% |
Tab |
Toggle panels |
Space + drag |
Pan canvas |
Common Workflows
Sketch-and-generate
- Open a blank canvas from + New → New image.
- Block in a rough composition with the brush on one layer.
- Add a new layer, select the region you want to generate, and bind the layer to a model or workflow in the Inspector.
- Write a prompt and Generate.
- Keep painting on top, then close the editor — the flattened result flows downstream.
Masking for inpaint
- Open or paste an image into a sketch.
- Add a layer, paint over the area to change, and mark it as the mask layer.
- Wire the node’s image and mask outputs into an inpaint node.
Quick retouch
- Open the image in the editor.
- Select the Clone Stamp (
S),Alt-click clean pixels, and paint over the blemish. - Adjust the layer opacity to blend, then save.
Related Nodes
The sketch type is also available as workflow nodes:
- Create Sketch — create a blank document with a chosen canvas size and background.
- Render Sketch — flatten layers, applying blend modes and opacity, to a single image.
- Sketch Layers — expose individual layer images for downstream nodes.
Related Features
- Asset Management — organize and reuse generated images
- Workflow Editor — main editor documentation
Last updated: June 2026